Giveaway!

Well, The Ecohousewives and Little Black Cat Organics have teamed up to do a Giveaway! There are two prizes:

1st Place is a prize pack that includes:

  1. One size Bamboo/Organic Cotton Fitted Diaper – fits approx. newborn to 35+ lbs
  2. 8 Bamboo/Organic Cotton Cloths Wipes – measure approx. 9″x9″
  3. Medium Pull-up Recycled, Felted Wool Soaker – fits approx. 10-22lbs
  4. Rose Water and Lavender Hemp Baby Lotion – 4oz bottle
  5. Green Bum Balm Diaper Rash Salve – 1.7oz jar

giveawayfinal


2nd Place is a $15 Gift Certificate to use towards anything from Little Black Cat Organics

Enter on our Facebook page, Little Black Cat Organics Facebook page or at a Rafflecopter giveaway directly and don’t forget to share, share, share! Contest runs until 11:00am Pacific Time on Friday May 24, 2012.


Juice Monkeys – the fruit and veggie kind!

20130513-192624.jpg

Colin and I recently starting juicing. When I talk about juicing, I don’t mean a glass of orange juice from the grocery store, I am talking about freshly pressed juice from a variety of fruits and vegetables. We had been considering it around the time that we first watched “Hungry for Change,” but had pretty much just been making smoothies with spinach and parsley thrown in for good measure. We have a juicer, but it collected dust in the cupboard until we watched “Fat, Sick and Nearly Dead.”
I know, I know, it seems like we make a lot food decisions based on documentaries. But look at it as an hour or two contains A LOT of information, and it is up to you what you do with that. We decided to make some changes with our eating.

What makes a lot of sense to us about juicing is what is in the juice itself – veggies and fruit. We have been making decisions to include more and more veggies in our diet, but juicing is like “extreme veggie eating,” and here is why:

1. Freshly pressed juice contains a lot of macronutrients. These nutrients include vitamins, minerals and other health and immune boosting components.

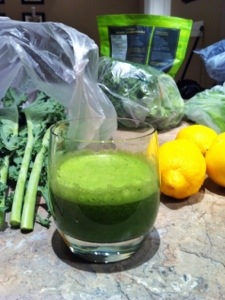
2. You get the health benefits of so many more vegetables and fruit than you would EVER be able to consume in one day. Just think, for breakfast, would you be able to eat an apple, half a grapefruit, half a cucumber, 4-5 leaves of kale, a handful each of parsley and spinach? I highly doubt it! By juicing, we remove the insoluble fibre, but keep the soluble fibre and all of the nutrients intact, and you can consume all of that in your juice!
If you want more info on the benefits of juicing, go here

So with all of this lovely knowledge, we had to decide how we were going to bring it into our diet. Although in “Fat, Sick and Nearly Dead,” Joe goes on a 60 day juicing fast, we knew that wasn’t for us. So we started slowly. We made juice the night before and had it ready and on-hand to replace our breakfast.
This is a great way to introduce fresh juice. It replaces a meal many of us are likely to skip anyhow, and it is a great grab-and-go option. Another choice is simply to include a nice tall glass of freshly pressed juice as a snack, or along with your lunch. It is better than not at all, and will kick start you getting all of those amazing nutrients!

After a few days of juice as breakfast, we decide to take the plunge…in the shallow end…and we are currently on a 5 day juice fast/cleanse. A big part of why we are doing this is to detoxify and clean out our bodies. Rather than get into detail here on this 5 day program, check out the Reboot website!
I would rather leave it to the experts to explain all of the dirty details, instead of missing something vital here!
Once we have finished this 5 day plan, I will let you know how it went, and how we feel.

So, onto the fun part, juicing! Here is my advice. I hope it helps!

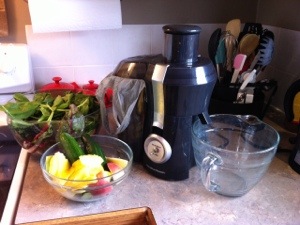
1. The first thing you will need is a good quality juicer. Don’t feel like you have to break the bank, but do some research and make sure it can handle leafy greens and firmer fruit, like apples. You don’t want to try and start juicing and all you bought was a citrus juicer!

2. Try to juice organic produce when you can find it and if you can afford it. It means that no pesticides etc will be in your detox juice, when that is the garbage you are trying to get out of your body anyways!
If you can’t go organic, be sure to wash all produce very well before juicing. It is best to leave the peel intact on apples, pears and carrots if you can, so scrub away!

3. Beets hold a lot of dirt, so either peel them or scrub them well, organic or not. Muddy tasting juice isn’t enjoyable for anyone!

4. Citrus fruit – to peel or not to peel? Again, if it is non-organic, scrub well. Some citrus fruit may even be waxed, so check for that before juicing. Otherwise, it is a personal flavour decision. I enjoy the fresh, bright flavour of lemon rind, but my husband finds it too sour and prefers to peel lemons. As far as oranges and grapefruit go, we have peeled them every time.

5. Follow the manufacturer’s instructions for your juicer. Know what it can handle, how you are supposed to juice certain items.
I got out juicer for free on Freecycle, so I had no instructions. If you happen to be sans instructions as well, it is usually a good idea to start with an easy to juice item, like a cucumber, follow with all the leafy greens, then apples, and end with easy juicers with a lot of liquid, like cucumber, pineapple or citrus fruits. This makes sure that cleaning your juicer goes much easier and nothing gets clogged up.

6. Experiment! It is just juice! Try a little ginger, it is full of healthy benefits. Be brave and juice some garlic! Whaaaaaaat???!!! I know…people do it. I have not yet been that brave!

7. Don’t try to juice avocado or bananas!!! If you want these in your juice, you will have to blend them with your juice in your blender. This isn’t a bad thing, and it creates a thicker, more smoothie-like texture.

8. Put a bag in the part of your juice to catch all of the non juicy waste. Even better if the bag is compostable and you compost everything instead of throwing it away.

So now that you are a juicing pro, here are a couple of recipes:

The Jolly Green Giant: (a great all-around green juice)
5-6 kale leaves
2 handfuls spinach
1 handful parsley
1 cucumber
2 apples
1 cup pineapple
1 lemon
Juice it all up! Much better cold (refrigerated or poured over ice).

The Happy Place: (Great as “dessert,” or when one more glass of green juice might make you a crazy person!)
1 1/2 cups pineapple
3-4 oranges, peeled
1 large ruby red grapefruit, peeled
So good poured over ice, still frothy from the juicer!

Two great websites for more juice recipes:

http://www.rebootwithjoe.com/recipes/ (obviously)
http://www.juicemaster.com/recipes/

20130513-192729.jpg

Strawberry Jam!!

I walked into the grocery store the other day and sitting there in all their glory were flats upon flats of fresh, beautiful strawberries! And of course, strategically placed right in front of the main entrance. How could I resist? 6lbs for $7? Pretty good. I thought to myself however, “Don’t bother… It’s just the beginning of the season. They WILL get cheaper!” Did I listen? Nope! I bought a flat. I wanted to make some jam!!! (And eat some of course!)

I’ve been itching to start some canning for awhile now. Last season I didn’t get much in. Between a kid under 1 and a husband who works out of town, there really wasn’t too much free time for canning. So, this is the perfect opportunity to get a little started! Strawberry jam, so delicious! So, here we go!

If you do a lot of canning already, you probably have the basic instruments needed to do the job. But, just in case you’re new to this here’s a short list of some stuff that’s good to have on hand:

-For jam specifically, you need just the basic Water Bath Canner, which can be found at pretty much any big box store for a very decent price.

-Jar lifter – this isn’t necessary, but your job will be so so much easier with it

-Canning funnel – again not necessary but makes the job much easier

-Mixing bowls, measuring cups and spoons, etc

For strawberry jam you will need (besides the strawberries!)

-some lemon juice

-sweetener of your choice (sugar, honey, some people use white grape juice, stevia, or a combo of sweeteners)

-pectin. I use liquid pectin, but you can also get it in crystallized form as well. This is just a preference thing.

 IMG_4404 IMG_4401
Step 1:
Before I made my jam, I washed the strawberries of course. I chose to soak them in a cool bath with castille soap first, to get any dirt, grime or pesticides off as best I could. I let them soak for about half and hour then, rinsed them off really well in cold water.
IMG_4398
Step 2:
This step may look a bit different for each person depending on how you like your jam. I don’t like chunkies in my jam so I chopped up my strawberries in a blender until there were no large chunks. It’s a good idea to add a little water to aid in the chopping process. You don’t have to puree them as they will dissolve more during the cooking process.
If you don’t care about chunks, you can go ahead and just mash them up with a potato masher by hand. This shouldn’t take you very long.
IMG_4400
Step 3:
Add your mushed up strawberries to a pot with the sugar. Most recipes will have a 4 cups strawberries (measured after crushing) to 7 cups sugar ratio. I used 6 cups of strawberries (measured after crushing) so that’s 10 cups of sugar. I know! So much sugar. Welcome to the jam world! Strawberries especially require a lot of sugar. You can reduce the amount of sugar but you won’t get the same consistency. Even when using no sugar needed pectin (which I personally don’t like as I never find it makes very good jam). If you reduce the sugar you will usually yield a runnier jam. It will still be as tasty though! I usually do reduce my sugar to about 8 cups. The jam turns out soft but still thick and spreadable. *If you are new to jam making I would stick to the recommended amount of sugar. It can be difficult to get the correct consistency when you are playing around with the sugar levels and so I recommend having an idea as to what you’re trying to achieve before changing it.
If you are using crystallized pectin, you need to reserve about 1/4 cup of the sugar to mix with it. I do recommend reading the instructions that came with your pectin, though. 
You will want to bring this mixture to a boil. Try doing it a little slower, this will generally result in a better jam. Once it is boiling, continue to let it boil for a few minutes, stirring occasionally.
*I don’t recommend making batches bigger than this.
IMG_4402
Step 4:
Slowly add your pectin to the mixture. Return to a boil and keep there for about a minute or so. Remove from heat. Add about 1/4 cup lemon juice.
Because I didn’t use as much sugar, I added 2 packets of liquid pectin to my recipe. (It is technically a double recipe according to their instructions anyways). To figure out how much pectin you need is going to take a little experimentation on your part. It will really depend on how you like your jam. If you like it runnier, then you will need less pectin, thicker will need more pectin. I will tell you how to figure it out in the next step.
IMG_4405
Step 5:
Skim the foam off the top of the jam. This foam is nothing gross, don’t worry. It is pretty much just escaped air trapped in jam goo (great description!).
Now, this is where I like to test if my jam is ready. Take a glass of ice water and place a spoon in it. Once the spoon, is cold, scoop up a little jam and rest the spoon back on top of the ice. Once the jam has come down to room temperature, you can check it’s consistency. Touch it, tip the spoon around, etc. If it’s at a consistency you like, then perfect! You are ready for the next step. If not, return it to the stove and repeat step 4 but with about a quarter of a packet of pectin. Repeat the test. Continue doing this until you reach your desired consistency.
IMG_4407
Step 6:
Fill your jars with jam. Leave about a 1/4in headspace (unfilled area) at the top. Tighten caps to finger strength tight. You need them to be tight enough to not let water in, but to let air out.
Place them in your water bath canner and process for 5 minutes (or more depending on elevation. I recommend looking this up before you do any canning. It does make a difference.)
You should always wait until the water in your canner returns to a boil before starting the count.
IMG_4408IMG_4410
Step 7:
Remove jars from water bath and place in an area out of direct light. Let them seal and cool to room temperature before storing.
IMG_4411
You’re done! Yay! Jam can be enjoyed right away. No need to wait for this one! If any of your jars don’t seal, put them in the fridge and eat them immediately. They will keep in the fridge as long as jam does, but they will not keep stored with your other canning.

Written by Nicole