A Natural Approach to Hair Care

My hair is one of the things I (and my husband) love most about myself, so naturally it was what I experimented with first when I started changing my beauty routine.
I never did have a brand of shampoo I was loyal to or loved very much. As much as I love my hair, I was never able to find a shampoo that was doing anything even close to great for it so I would just buy whatever was cheap and use a lot of conditioner. My hair was dry! So dry! Hence, the use of copious amounts of conditioner, including the leave in variety.

About a year and a half ago or so, I came across a brand called Live Clean. It wasn’t much more expensive than the regular brands and claimed to be 96% naturally derived. I thought I might as well give it a try. I snapped up the moisturizing variety and tried it out. It smelled great and my hair was definitely noticeably less dry. And then I discovered they had a beautiful leave in conditioner (which I definitely had an intervention required level of addiction to). Life was pretty good and I continued to use this combo for several months until one day I took a hard look at the ingredients list and despite being Soium Lauryl Sulfate (SLS), paraben, etc. free it looked pretty much identical to every other shampoo. And, many of the natural ingredients are, in actual fact, useless for hair and skin care (and potential irritants for those with more sensitive skin). I felt I could do better.

Live Clean shampoo and conditioner - www.live-clean.com

Live Clean shampoo and conditioner – http://www.live-clean.com

So, I was on the hunt again. I looked around my local natural food and beauty stores, but that didn’t actually last very long. Some of the brands still contained SLS or other no-nos and the rest were charging an arm and a leg. I felt that I could come up with something for a lot less or a least a little less. So, I took to the Internet. The first thing I tried was this recipe. I thought “how could I go wrong with coconut milk?” I, just like her, have baby fine hair! But, what works for some does not work for others. My hair was oh so greasy. On a side note, it works great as shaving cream!

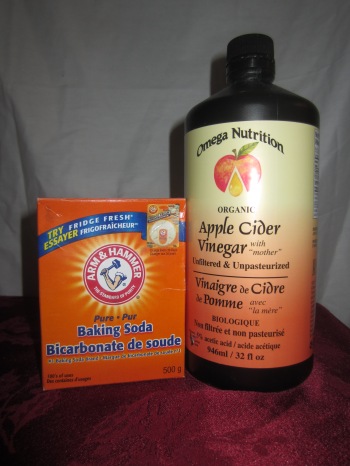
This is when I stumbled upon the ‘no poo’ method. Quite simply, you use baking soda and apple cider vinegar to wash your hair. After doing further research, I decided I didn’t have anything to lose by giving it a try.
The first time I tried it out I used a tbsp of baking soda and two tbsp of the vinegar. You mix enough water with the baking soda to dissolve it completely and pour it over your roots. After letting it sit for a for minutes (this is when I do my shaving) then you give your scalp a good massage and rinse WELL. You also mix a good amount of water with the vinegar and then pour it over your ends only (if you poor it over your roots your hair will get quite oily). You also want to let this sit for a couple minutes. Apple cider vinegar is a natural conditioner and works very well. My hair was amazing clean and, contrary to what I thought would be the case, really easy to comb out. I loved it. So I continued doing it. My husband was doing it as well since I wasn’t buying shampoo at all and he was having no problems either.

Baking Soda & ACV

Soon after though, I started to notice my hair was becoming a bit flaky with what I assume was baking soda build up and simply reduced the amount I was using. That fixed the problem immediately.
Then I encountered a new problem. My hair was getting really greasy! Again? This was weird for me as my hair used to be so dry, but I learned there was nothing I could do about this but wait it out. The reason for this being that shampoo strips away a lot of your natural oils and leaves you feeling dried out. So, even though you’re still producing oils you would never notice because you’re stripping it all away every time you shampoo. And now you’re overproducing because you’re poor scalp can’t keep up with the oils you’re stripping away! I was determined to find something that worked though, and since it did leave my hair feeling so amazing I decided to wait it out.
It took about 2 months, and a lot of ponytails, but sure enough, my hair finally evened out. It was beautiful and amazing. I was happy. I was chemical free. At this point I was washing my hair every second day.

But I wasn’t done there. I had a conversation with a close friend one day about my new hair washing techniques and she inquired if this was even necessary as she knew someone who never washed her hair with anything. Just clean water and scalp massage. So this got me thinking… Was it? So, at this point I figured I could at least try it out. So I did. I decided to see how long I could go without washing my hair at all before it felt necessary to do so. The first time I lasted about 5 days. But the longer I went, the longer I could go. I simply gave myself a good (and definitely relaxing) scalp massage to break up any dirt and gunk. My hair never felt very dirty actually, it would just eventually start feeling greasy. I was actually surprised. And still very happy.
So where do I stand today? I wash my hair maybe 2 or 3 times a month with a bit of baking soda and apple cider vinegar. The rest of the time a good scalp massage is all that’s needed. A little bit (and I mean a TINY bit) of coconut oil on those days when my hair is frizzy works great! My hair has never been healthier and it’s no longer dry. My husband, who used to struggle with dandruff has said it has naturally gotten much better, but he uses a drop or two of tea tree oil in the baking soda once in a while to help with this (which is also good for dry scalp).
Only downside… My hair just smells like hair!

*Yes, I use Arm and Hammer! *gasp* But contrary to popular belief, Arm and Hammer does not contain any aluminum and is mostly mined from trona ore; the same as all the expensive ones out there.

– This post was written by Nicole

Pining for a Real Christmas Tree?

OK, aside from the fact that that was a really corny title (the other option was a sappy title…get it – sappy?), I really do love to have a real Christmas tree. Nothing says Christmas like a pine needle stuck in your toe.

OK, I’ll branch out a little…

I’ll bark out some facts at you…

I’ll focus on the trunk of the issue…that was a stretch – I admit it  – I’ll stop…

Can anyone out there make a pun out of the word “tannenbaum?”

This post isn’t really about my horrible jokes; it is about having a real Christmas tree, versus having an artificial one. I could go on and on about the smell and the tradition and all of that, but what I am really interested in, and what you may be too, is which is the better choice for the environment?

But first, the fun stuff!

We have bought real, farmed trees from local stores for the past few years, but a bout of nostalgia for chopping down trees with my Dad and my siblings made me want to go and trek through calf-deep snow for my own wild tree.

Starting to search!

A friend of mine picked us up a Christmas tree cutting permit for the hefty fee of $5 for three trees. Colin and I rounded up his sister and her fiancé and made an afternoon of it!

We took a half hour drive out to our permit area, eyes peeled along the road for “the spot.” The first “spot” was pretty dismal, so we shook off the snow and piled back in the truck for better luck. And then the sun started to drop.

At spot # 2, we noticed a couple of possible winners, but kept on trekking for that perfect tree.  And then, there she was – my tree! Colin’s sister’s was close by and that’s when we realized we had no saw…

HA! No, we totally had a saw; there was no way we were pulling a “National Lampoon’s Christmas Vacation Moment.”

So my big strong man sawed down the trees, then we dragged them to the truck – but not before some obligatory photos! And all 15 minutes before the sun sank into the hills.

The perfect tree!

Note: If you are tree hunting, bring a sister-in-law who packs hot chocolate and sandwiches.

Also – trees in the wild aren’t perfect – so don’t expect that; just enjoy being out in nature with friends, family, and a hacksaw. Give yourselves lots of time – the hunt for your family’s tree is all part of the fun!


So without further ado – the facts:

The Fake Tree:

  1. The biggest issue with artificial Christmas trees is that they are typically made with polyvinyl chloride (PVC). PVC is a non-renewable oil-based plastic that emits many greenhouse gasses during production. It has been estimated that the energy used to make one fake tree would require that it be used for two decades before it could match the carbon footprint of a farmed (real) tree.
  2. To add to the PVC nightmare, fake trees can continue to release trace gasses into the air over time.
  3. Now you want pre-lit? Or that new brand that looks so…real…your tree will be added to a landfill, incapable of biodegrading, thanks to that PVC.
  4. Many artificial trees are produced overseas, adding travel emissions to their environmental impact.
  5. The money you spend on a fake tree goes to the large multinational company who made it.

The Real Tree:

  1. Real trees, as we know, absorb carbon dioxide and emit oxygen. This actually helps prevent the “greenhouse effect” of global warming. One acre of live Christmas trees produces the daily oxygen requirement for 18 people.
  2. Christmas tree farms and wilderness areas stabilize the soil, provide living areas for wildlife and create scenic greenbelts.
  3. Contrary to what has been argued before, Christmas tree farms do not need a lot of fertilizers or other chemicals to grow, and are often grown in soil that cannot support other crops. Wild trees don’t need any chemicals at all!
  4. When you buy from a local tree farm, you are supporting your local economy. When you purchase a tree permit, that money goes back into sustainable resource development for your region (check with your local forestry office, this may differ in other areas).

I think the winner is pretty clear, and there are a lot of articles out there that support this.

But maybe you already own a fake tree, or your landlord doesn’t allow real ones. I suggest you make sure your tree doesn’t contain lead (some older ones or really cheap ones do). This can actually flake off and sit on presents, carpet etc.

If you don’t want your fake tree anymore, donate it instead of throwing it out. Or hold onto your tree for a long time (that two decades?), instead of upgrading every 3-5 years.

If you chop down a tree in the wild like we did, make sure to get a permit from your local forestry office. This way you are cutting in an area that has been designated to have ample tree growth, and may even have re-planting practices in place.

And if you just can’t bear the thought of a fake tree, but don’t want to cut one, buy a nice potted evergreen, and plant it outside in the spring (or right away if your ground isn’t frozen). My Grandpa and Grandma used to do this every year and had a lovely collection of evergreens in their front yard. I had no idea Grandpa was such an eco-pioneer!

Merry Christmas from the Eco Housewives!

Merry Christmas from the Eco Housewives!

Sources:

http://www.christmas-tree.com/real/realchristmastrees.html

http://environment.about.com/od/greenchristmas/a/christmas_trees.htm

http://greatist.com/health/real-christmas-tree-healthier/

http://www.thewhig.com/2012/12/14/real-winner-in-christmas-tree-debate

This article was written by Aubrey

Colourful and Edible Finger Paint!

Paint 1
Last year for Mother’s Day I wanted Miss A to do something special for my mum and mother-in-law.I’m always stumped for gifts for these two fabulous ladies, and I thought something that their granddaughter made would be perfect.  Enter Pinterest. I saw this adorable idea and thought: “we can totally do this.”  I bought a couple of photo frames from Wal Mart and took a photo of her painting and filled the top space with that and the bottom space with an actual painting that she created. It was such a big hit! Her grandmas loved them!
paint 3
Here’s a photo of our little doll enjoying herself! Note: I will admit that I sort of had to force her to “paint” on the paper, she was WAY more interested in tasting the paint.
Miss A was only 10 months old at the time and was at that stage where
EVERYTHING went in her mouth..actually, she’s still in that stage! I was worried about buying finger paints, so I decided to make my own. This is the recipe I used:
~INGREDIENTS~
  • 1/2 cup cornstarch
  • 3 Tbsp. sugar
  • 1/2 tsp. salt
  • 2 cups cold water
  • food colouring
1) In a saucepan, mix all the ingredients together except the food colouring. Cook over medium-low heat, heat the mixture for about 10 to 15 minutes. Make sure that you are stirring the mixture the entire time it is on the heat
2) After the finger paint has thickened take the pan off the stove immediately, and let the mixture cool. I split the mixture in four plastic bowls to cool.
3) In each bowl, I used several drops of food colouring to create the  colours that I wanted. This recipe makes a lot of paint, so you could make several colours. I just stuck to red, green, yellow and blue.
I was so proud of myself and my homemade finger paint that I posted this photo on Facebook and I had over 30 people ask me for the recipe. A lot of the mamas asked me if the painted stained my little babe’s fingers. The answer is no; I didn’t have any trouble with staining, but it did get me thinking about natural food dyes and whether or not it was a good idea to let her eat it the stuff with food colouring in it.
So, a few months later, we tried again, but this time, I avoided using food colouring and instead I made my own natural food colouring. Now, there are lots of different ways to make these colours, but, when you’re 8 months pregnant, trying to get settled and unpack a house while simultaneously trying to take care of a toddler and get ready for Christmas, easy is always better!!
Paint 2
Here’s what I did:
Yellow: 1/2 tsp of stale turmeric (I know some of you may think that this will stain, but it actually didn’t stain her fingers!)
Red: Brew a really strong cup of raspberry tea and use one cup of that and the other cup of water (make sure tea is cool) (3 teabags into one cup of water)
Blue/Purple: Blueberries from my Costco berry mix. I just mashed up some berries and put the juice in the mixture
Green: 30 drops of  chlorophyll concentrate made a nice green colour
The colours weren’t as vibrant as when I used store-bought food colouring, but I felt a little bit better about letting her eat the stuff. We were also gifted a couple of colours of Maggie’s Natural Food Colouring, but at $12/colour, I didn’t want to use it on an art project. You can find Maggie’s Food Colouring at Raspberry Kids–one of my favourite Canadian owned Kid’s stores!
Miss A wasn’t nearly as excited about the whole thing this time around (go figure). I had to force her to sit still and actually paint. She wanted to get up and run away with the paint bowls! Oh, and she didn’t even TRY to taste the stuff! Sigh….
This article was written by Andrea
Have any of you tried making finger paint? Do you have a fool-proof recipe to share? What about natural dyes? We’d love to hear your ideas!

Sugar Alternatives: Stevia

Overall, I am not a fan of fake sugars (aspartame, sucralose, you name it). They are chemically produced or altered, and they give me migraines (never a good sign).
But I have a huge sweet tooth, accompanied by a desire to lose weight. And so begins my love affair with Stevia.
Stevia is a South American herb that has been used as a sweetener for hundreds of years. The leaves of this small, green Stevia rebaudiana plant can be 30 times sweeter than sugar. It used to be found mostly in health food stores, but can now be found in packets at my local grocery store. If you want more options, head to your local health sotre – they will have stevia in many forms (powder, granule, tincture/liquid) and many more brands to choose from. I have been told the liquid form can have a slight licorice flavour, but I use the powdered form. It dissolves easily and can be mixed into almost anything for added sweetness.
Stevia has many excellent properties. The body does not metabolize the sweet glycosides from the stevia leaf or any of its processed forms – so there is no caloric intake. Stevia doesn’t adversely affect blood glucose levels and can therefore be used safely by diabetics.
Photo by Ethel Aardvark
I use stevia in my homemade frozen yogurt-and it works great! A few little packets sweetened as much as a cup of sugar!
It can’t be substituted in everything, as its texture is different from sugar. So meringues, icings, most cookies; anytime when sugar’s ability to stiffen and cream with butter is required-then I recommend using the real deal-sugar (unrefined when possible). Try it out in your coffee, on your (homemade) yogurt, anywhere you might be using aspartame or Splenda…
As the Canadian and USA governments slowly approve Stevia, you can now find it in place of artificial sweeteners in some mainstream brands. SoBe has a few of their drinks made with stevia, and the new 10Cal Vitamin water by Aquafina as has it. You’ll often see the brand Purevia or Truvia on the bottle as the stevia brand.
Of course, with any new item your are introducing into your diet, do your research on stevia. The Japanese, Chinese, and Koreans have used stevia in foods and soft drinks for many years as an alternative to the artificial sweeteners. The wide use of stevia has been without any apparent harmful effects.
In 2006, the World Health Organization evaluated stevia and found no evidence that its sweet compounds, stevioside and rebaudioside A, have any carcinogenic activity.  The most recent studies seem to suggest stevia is safe, but there is a lack of human research to determine long-term risks.
In my opinion, anything natural must be a better and healthier option than artificial, chemical sweeteners!
Thanks to http://www.stevia.com/http://www.vegetarian-nutrition.info/herbs/stevia.php and Wikipedia for some of the background info! Go to http://www.stevia.com/ for recipes, and to order some it if you find (GASP!) that your local grocery store doesn’t have it.
This article was written by Aubrey

Making Your Own Yogurt and Greek Yogurt

Many people are surprised when I tell them that I make my own yogurt. But in reality it is cheaper than you think, and much easier than you think!
What I love about making my own yogurt is that I can control what goes into it. I can sweeten it with sugar, honey or stevia. I can use fresh, organic fruit to flavour it.
To top it off, homemade yogurt is full of healthy bacteria!
Rather than using a thickener, I use a higher fat yogurt. Another option is to strain the yogurt (more on that below) to make a thicker, creamier Greek-style yogurt.
Some people use electric yogurt machines, but I choose to use the (much cheaper) Yogotherm yogurt maker. Really, all it does it insulate the yogurt as it ferments.
To make your first batch, you can use a yogurt starter, such as Yogourmet, shown below. After that, you can use your existing yogurt to start your next batch (much cheaper)!
The basics are as follows*:
1. Bring 1 litre of milk to it’s boiling point.
2. Allow to cool to 25 Celsius
3. Mix starter with a small amount of cooled milk until starter dissolves.
4. Mix that small amount of milk into the rest.
5. Pour into Yogotherm and leave at room temp for 12-18 hours.
6. Put finished yogurt in the fridge.
*Just in case, always follow the recipe on your starter, in case it differs from mine.
But see? It is so simple! And from this you can have your morning yogurt, yogurt smoothies, frozen yogurt…and the possibilities go on!
Greek Yogurt:
So, by now you might have tried making your own homemade yogurt. I hope you and your family have enjoyed it!
You probably noticed that your yogurt can have a tendency to separate, and the whey will float on top. That’s because your yogurt doesn’t have any additives to keep this from happening. Just stir it back into the yogurt – OR – strain it off and make some deliciously thick and creamy Greek yogurt!
I know this looks nasty-but it is perfectly normal!
Greek yogurt also takes some of that “sour” flavour out of your homemade yogurt. It is also better for cooking (tzatziki, yogurt-based curries, etc.), as it won’t “separate out” the way regular yogurt will. It also makes a much creamier frozen yogurt.
To make your Greek yogurt, place a fine mesh sieve over a large bowl. Line that sieve with coffee filters. Pour regular yogurt into the sieve.
All set up to strain the yogurt!
Pop the bowl in the yogurt for 3 hours or overnight, and the next day, the whey will have drained through to the bowl, and you will be left with Greek yogurt.
If you are in a rush, pour your yogurt into a clean, white tea towel, and squeeze out the excess whey before placing the tea towel into the sieve for an hour or two. Keep in mind-this is messier than the coffee filters!
Now for all you calorie counters out there, remember that your Greek yogurt is a concentrated version of your regular yogurt! But I find find Greek yogurt to be more filling, so it’s a decent trade-off.
Enjoy your homemade Greek yogurt!
*The Eco Housewives have not received any compensation or benefits from the companies mentioned in this article. Not that we would mind if we did…
Post written by Aubrey

A Tale of Two Smellys

OK, so just one smelly…me.

I much as I hate to admit it, I have a tendency to smell when I sweat.

I am not one of those people who can go without deodorant (and let’s face it, anyone I know who thinks they can…they are wrong…your ‘natural scent’ is not ‘alluring to the ladies.’).

But despite the fact that I can’t go more than an hour without putting on some deodorant, I was sick of wearing aluminum-based antiperspirants. Without getting into the whole safe/not-safe debate about aluminum in detail, my main reasons for wanting to switch were:

1. Clogging my sweat glands. In my opinion, it can’t be healthy to clog your sweat glands all day, every day. Think about it…your sweat glands were created to…sweat…

2. The aluminum-Alzheimer’s disease link. Yes, it is yet unproven. But since I had both of my Grandma’s suffer from Alzheimer’s, I have decided not to take any chances. Not cooking in aluminum pots, no aluminum in my pits. Done and done.

You may have a whole list of your own reasons for wanting to rid your medicine cabinet of antiperspirant. You may think antiperspirant is a gift from the gods to save you from social ruin because you smell like a dirty hippie-treeplanter after a week-long plant trip (don’t know any treeplanters? Head to Northern BC…you can smell them a mile off).

I, like you, do not want to smell. I don’t want to be “the girl who gave up antiperspirant” at work…only I never even told anyone, they just knew.

So I started to test out deodorants. And it was a rough road. There were days when I knew this deodorant wasn’t working…and I still had 4 hours of work left.
So I suggest…keep a stick of your tried-and-true close by…in case of a stinktastic emergency. Then once you know there is one you love, you can chuck that pore-clogging, toxic garbage you have been swiping on your underarms until now! Yay!

The Not-So-Natural but Aluminum-Free All the Same:

So I started with baby steps. These were fairly easy to find, they were cheap…you heard me…they were at WalMart.

sftndrydeo

Soft&Dri aluminumfree

I bought this one in the darling scent “Sweet Bliss,” which is a light, slightly perfume-y scent. Nothing crazy. It smelled like deodorant.
It wasn’t hugely strong in it’s ability to fight my stink. It lasted about 6 hours in that department. But the downside – this baby had ZERO absorption. So if it was hot out, or I was stressed = mega sweaty. So I may not have smelled, but I am still not a fan of sweat rings on my tops. I still have most of my stick left, which goes to show how long I was willing to put up with it.
Out of 10…I give this one a 5…nice scent, stopped some stink, but not amazing.

adidasdeoAdidas cottonTECH+ Absorbent-Deo
If your #1 trigger is cost, this is the aluminum-free choice for you. That is likely why my Mom loves it. Even after I gushed about my top pick (be patient, I will get there), she still chose to use Adidas, since it costs her around $2.50 at WalMart or Superstore. But not only is it cheap, it works remarkably well. The cottonTECH helps absorb excess wetness, there is a range of scents to choose from (okay, a small range – maybe 3), and it lasts for most of the day. Basically, if you are going dancing after work, give it another quick application.
Out of 10…this one gets a 7-8…the only downside is it is still fairly chemical-based and it does leave slight white marks.

So although the Adidas was becoming my fall-back, I did want to give some other more natural options a try…

The Hippy-Dippy ‘Natural’ Options:

I wanted something with more natural ingredients – not simply aluminum-free.

Lush’s “Aromarant”

So to start, I LOVE Lush. I cannot say enough good things about them. I am obsessed with their bath bombs, lotions, face wash, etc. It is great stuff! You know what else I love about Lush? They will give you a sample of their solid deodorant bar and you don’t have to pay to find out it doesn’t work for you at all.
I didn’t like holding the bar to put it on and getting it on my fingers (picky, picky, I know!)…I didn’t like how I felt I had to push really hard to even get any onto my pits…and the biggest one…I didn’t like stinking. I know, right? That’s such a small issue! Ummm…no.
So out of 10…I give Lush’s “Aromarant” an E for effort…sorry.

tomsdeo Tom’s Of Maine Natural – Original – Deodorant

So this bad-boy claimed it uses hops to inhibit growth of odour-causing bacteria, and is chock full of other beautiful and natural ingredients.
Normally Tom’s makes great stuff. They are a pretty big name in the natural world. You can even buy their stuff at WalMart. I KNOW! Even though it is about double the cost of the Adidas. But I was excited – a natural deodorant that I don’t have to make a special trip for – YES!!! But then… NOOOOOOOOO!!! Initially I was excited – I had bought Honeysuckle Rose. It smelled like Climb On! – a super moisturizing lotion Colin and I use after rock climbing. It smells like a clean, citrus-y hippy. I love it. But after half a day… I smelled like…well, those treeplanters I spoke about earlier. It was not good. It was really not good during hot yoga. I will take a moment to apologize to everyone around me. We were all sweaty, we all smelled. But I smelled the worst. Or at least I feel like I did.
And here’s the worst part…I kept trying! I loved the way it smelled so much, I would use it on days when I wasn’t working out, or doing much of anything. But sometimes…it would still stop working.
So for a while I gave up. I was using that Adidas stuff – at least I was fresh!
So for Tom’s…you get a 4 out of 10. Your ingredients are noble, you smell like a dream…but I didn’t after a few hours. And that is why you lose.
bodyshopdeoThe Body Shop’s “DeoDry” Dry Effect Deodorant

And then I found this. I saw a review in a discarded Best Health magazine at our campground. (Shut up…I was not garbage picking, someone had placed a pile for us all to enjoy – so I took half of them) They said they liked the Body Shop deodorant. My hope was renewed. I sang an impromptu dance number right there by the lake. OK that last part didn’t happen. Except in my head.
So after vacation, I headed to good old Body Shop. At first, I picked up the liquid kind in the Chilled & Breezy scent. I returned it. The girl had suggested the liquid over the solid since it was less likely to leave white marks. But I HATE….HAAAAAAAATE standing in the bathroom with my arms in the air, waiting for my deodorant to dry. I also hated that Chilled & Breezy made me smell like I had mouthwash on my armpits. But I wasn’t willing to give up…so I headed back and exchanged it for the solid deodorant in Fresh & Floral. And I fell in love. DeoDry contains volcanic minerals, which help absorb the excess wetness, and a bunch of essential oils, for a bunch of other things (technical, I know). The Fresh & Floral has a light floral scent, but nothing that overpowers my perfume or any other scents. It keeps me smelling fresh all day. It is wonderful! There aren’t significant white marks that I have noticed.
The only downside is that the volcanic minerals can build up if you don’t give your pits a good scrubbin’ in the shower, and that can lead to clogged pores. Note I did not say clogged sweat glands. But I scrub my pits anyways…so I have found that to be a non-issue.
So DeoDry, I give you a 9 out of 10…and a big hug for saving the day!

On a side note…don’t even bother with anything called a Crystal Stick. They are all awful. The solid crystal stick – is awful. The liquid crystal stick – is awful. Try out Tom’s; try the other kinds offered at Lush; try whatever, but save your money and ignore that crappy crystal stick. It stinks, and so will you.

So, (under)armed with this, head out and try some deodorants and throw that nasty Lady Speed Stick away! Maybe you are at the low end of the sweaty scale and can get away with the delightful smelling Tom’s of Maine *sob*. I am still sad that one didn’t work out…

*The Eco Housewives have not received any compensation or benefits from the companies mentioned in this article. Not that we would mind if we did…

This article was written by Aubrey

Meet the Eco Housewives!

The Eco Housewives met in high school, in the colder parts of British Columbia. Although being eco-friendly came low on the list of high school priorities, I am pretty sure we recycled empty drink containers. After graduation, high school friendships drifted apart as husbands, careers, and babies kept us busy and moved us away. Once Facebook rolled around, we started to get back in touch – and noticed a similar pattern to our wall posts. Natural cleaning alternatives, cloth diaper contests, canning, gardening; they were all clearly items that held our interest. So here we are – exploring how to make that switch to a cleaner, greener lifestyle – and sharing it with you! The year of our 10 year high school graduation anniversary, we decided to start one more group project – minus the glue sticks and class presentations. Welcome!

Credit - Sakura Photography

Credit – Sakura Photography

Andrea:

Andrea lives in the sunny Okanagan with her husband and their 2 beautiful daughters.
During her first pregnancy she started feeling the need to purge her household of unnecessary chemicals and started making her own cleaning products. With the arrival of their daughter, Andrea felt the need to make more eco-friendly choices and quickly fell in love with her grain mill, canning pot and lovely vegetable garden. When Andrea isn’t busy laundering cloth diapers, she enjoys finding new ways to be a better steward of the resources that God has given us.

Aubrey profileAubrey:

Aubrey lives in Southern Alberta with her husband and an adorable pomeranian-dashund mix named Kiely.
Aubrey was raised by a mother who baked, canned, and used phrases like “you need to be a good steward of your environment.”
Once married and on her own, Aubrey began exploring the options out there to better be that “good steward.” She started slowly with small things, like recycling and compact flourescent bulbs. Now Aubrey has expanded her skills. Her neighbour says she makes the best canned pickles (probably all the extra garlic) and she is slowly weaning her husband off of chemicals for cleaning the house and switching to more natural options.

Credit - Krista Lee Photography

Credit – Krista Lee Photography

Nicole:

Nicole lives in Southern BC with her husband and young son.

She was raised in a small community on well water, homegrown food from her grandmother’s garden, and homemade pickles.
When Nicole ventured out on her own, remembering how much she loved those delicious, homemade pickles, she decided to make them herself. Those pickles turned into a variety of home canned goods and a love of gardening. Soon that was followed by experimenting with eco-friendly options all over the home, and she continues to find ways to better serve her environment and her family through recycling and upcycling, and cutting down on chemicals around the home and in the pantry.